How to modify the Window Level and save these preset values?
Modify the window level using the mouse
You can modify the window level of the images with your mouse by following these steps:
- Put your mouse cursor above an image of a series in a display area and press the left mouse button while holding the 'Alt' key.
- While holding the left mouse button, move your mouse upward (away from you) or downward (toward you) to modify the center position of the window level. Moving the mouse to the left or the right will modify the width of the window level. The current window level values will be displayed in the bottom right corner of the image.
- Release the left mouse button.
By default, all images in the display area will be affected by the new window level values. If you want to modify the window level of one or more images independently, uncheck the "Auto propagate settings to all images" in the "Image" menu of the 2D Viewer window. In this case, only the selected images will be affected.
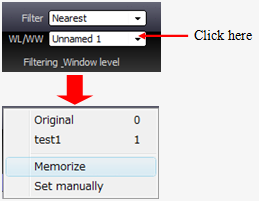
You can also control the Window Level by clicking on the "WL/WW" button in the "left mouse button" toolbar:
Reset an image
You can reset the Window Level (as well as the pan, rotation, flip and zoom) in every image, by clicking on the below button, in the toolbar of the display area:

Create and use some preset window level values
With Onis, you can create some preset window level values and using it anytime in any display area.
To create, modify or delete a preset value, open the window level combo box on the toolbar of the 2D Viewer window and select "Memorize".
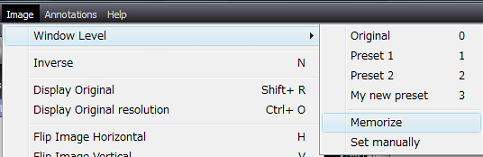
You can also go in the "Image" menu, and "Window Level" sub-menu to select "Memorize":
- To create a new window level preset value:
- Set the window center and window width values in the edit boxes.
- Write a name for your new preset
- Click on the "Add" button.
The new window level preset values have been saved and added to the list of preset values.
- To modify a window level preset value:
- To delete a window level preset value:
- Select in the list the preset values that you want to delete. Multiple presets can be selected by clicking while holding the "Shift" key for continuous selection or the "Ctrl" key for a noncontiguous selection.
- Click on the "Del" key.
- Click "Yes" on the confirmation dialog box to delete the selected preset. Click "No" to cancel.
- To assign a window level preset value to all the images of a display area:
- Click on a display area to select it.
- Open the window level combo box on the toolbar of the 2D Viewer window and select the preset name you want to assign to the selected display area. (You can also hit the corresponding shortcut.)
- All the images of the series displayed in the selected display area have been affected by the selected preset value.
Note: The Window Level presets have shortcuts by default. To change them, see "How to change the shortcuts?".
- To restore the original Window Level value
You can restore the original Window Level values of all the images of a series displayed in a display area by following these instructions:
- Click on a display area to select it.
- Open the window level combo box on the toolbar of the 2D Viewer window and select the "Original" preset name. You can also hit the '0' key shortcut by default.
- All the images of the series displayed in the selected display area have had their window level values reset to their original ones.
Inverse color:
You can inverse color of the current display area by hitting the "N" key or by clicking on the "Inverse color" button in its toolbar.
By default, all images in the display area will be affected. If you want to inverse color of one image independently, uncheck the "Auto propagate settings to all images" in the "Image" menu of the 2D Viewer window. In this case, only the selected images will be affected.
- You can find the "Inverse color" function in the context menu (right mouse button) and the top menu:
|